
The Magic of Resin Art: Tips for Beginners

The Magic of Resin Art: Tips for Beginners Resin art has become one of the most popular crafts, known for its glossy finish and endless creative possibilities. From coasters to jewelry and wall art, resin allows you to create stunning pieces with a professional look. What You’ll Need to Start Epoxy Resin and Hardener: Choose a high-quality resin that’s crystal clear and easy to work with. Molds: Silicone molds are reusable and come in various shapes and sizes. Pigments and Inclusions: Use mica powders, alcohol inks, glitter, and even dried flowers for customization. Safety Gear: Always wear gloves and work in a well-ventilated area to avoid inhaling fumes. Steps to Create Your First Resin Piece Prepare Your Workspace: Cover your table with plastic and have all tools within reach. Mix the Resin: Follow the manufacturer’s instructions for the correct ratio of resin to hardener. Add Colors and Embellishments: Mix in pigments, glitter, or other decorations. Pour and Set: Carefully pour the resin into molds and let it cure for 24-48 hours. Tips for Success Work in small batches to avoid waste. Use a heat gun to remove air bubbles for a flawless finish. Experiment with layering to create depth in your designs. Resin art is both exciting and versatile. With practice, you can transform simple materials into eye-catching masterpieces.
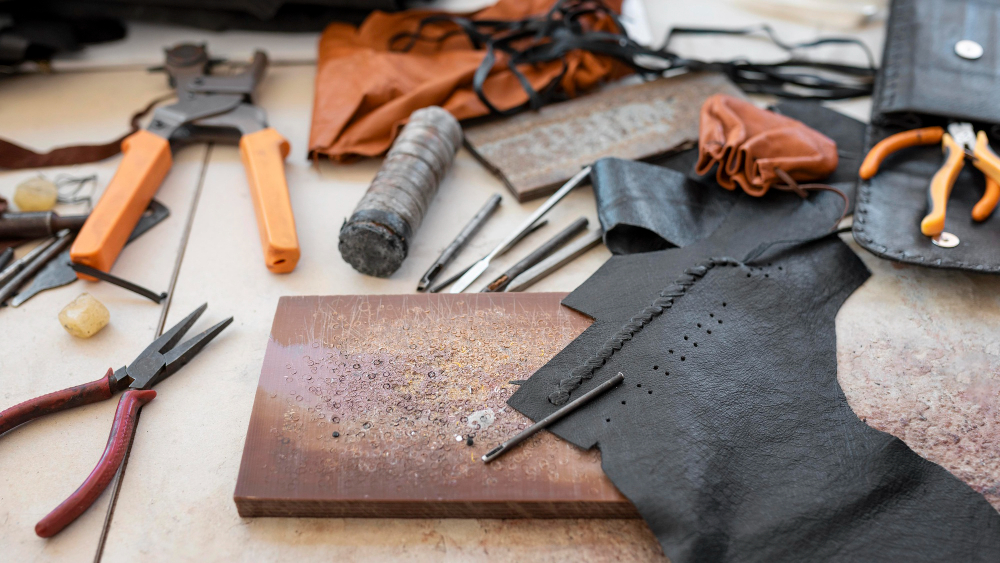
How to Get Started with Leather Crafting
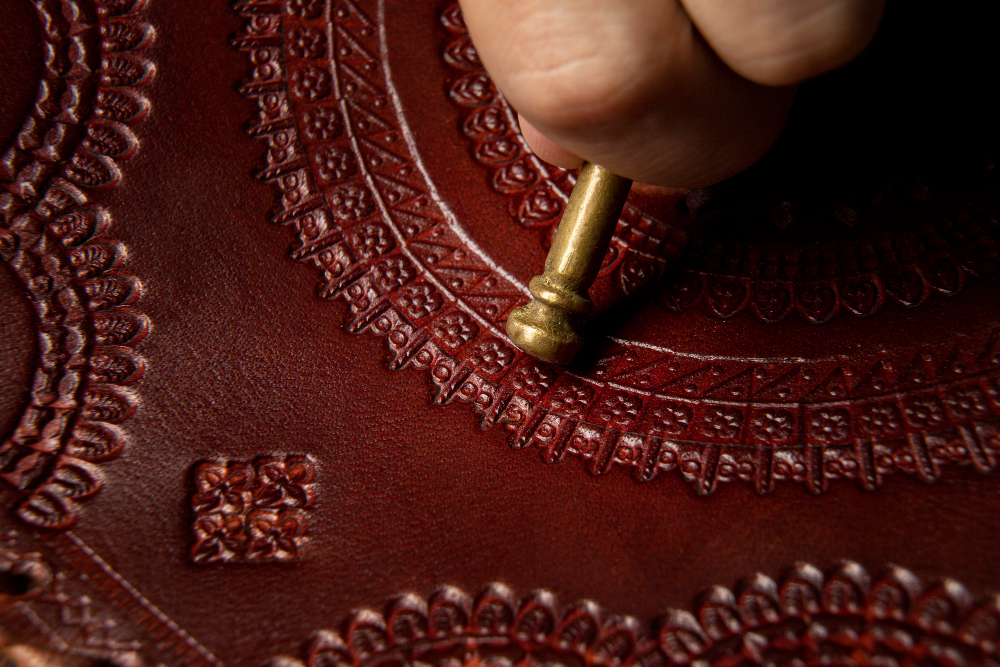
How to Get Started with Leather Crafting Leather crafting is a rewarding skill that combines precision and creativity. From wallets to belts and bags, leather items are durable, functional, and timeless. If you’re ready to start your leather crafting journey, here’s a beginner-friendly guide: Essential Tools for Leather Crafting Cutting Tools: A sharp utility knife or rotary cutter ensures clean cuts. Punching Tools: Hole punches are crucial for belts, bags, and other items that require stitching or fasteners. Edge Bevelers: These help smooth and round the edges of leather for a polished finish. Needles and Thread: Waxed thread and sturdy needles are ideal for hand stitching. Choosing the Right Leather Start with softer, more pliable leather, as it’s easier to handle. Vegetable-tanned leather is a popular choice for beginners because it’s versatile and works well for stamping and dyeing. Beginner Projects to Try Keychains: A simple project to practice cutting and stamping. Card Holders: Great for learning stitching techniques. Bracelets: Perfect for experimenting with dyeing and embellishments. Leather crafting takes time to master, but with patience and practice, you’ll create items that are both beautiful and durable.
The Art of Soap and Candle Making: A Beginner’s Guide
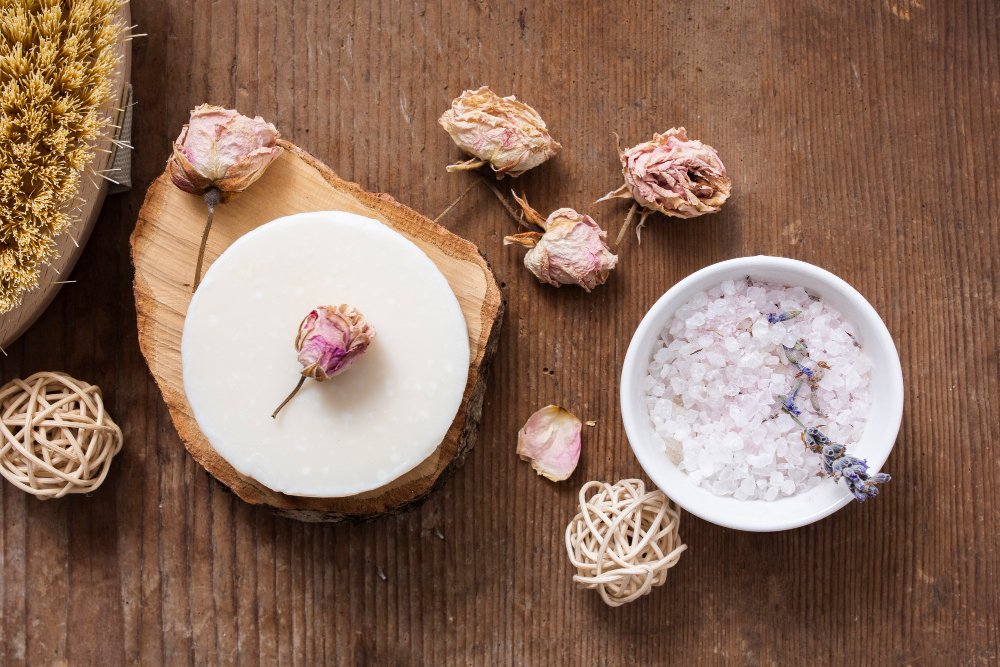
The Art of Soap and Candle Making: A Beginner’s Guide Soap and candle making are timeless crafts that not only allow you to create beautiful and functional items but also offer a therapeutic experience. If you’re just starting, here’s a beginner’s guide to help you dive into this rewarding hobby. Why Soap and Candle Making? These crafts are perfect for creating personalized gifts, adding a touch of charm to your home, or even starting a small business. Plus, they allow you to experiment with scents, colors, and designs, making every creation unique. Getting Started with Soap Making Choose Your Soap Base: For beginners, melt-and-pour bases are the easiest to use. They’re pre-made and require minimal equipment. Add Colors and Scents: Use natural colorants like mica powders and essential oils for a customized touch. Mold Your Soap: Pour the melted soap into silicone molds and let it set for several hours. Getting Started with Candle Making Select Your Wax: Soy and beeswax are popular for their clean burn and eco-friendliness. Prepare Your Wick: Attach the wick to the center of your container before pouring the wax. Melt and Pour: Melt the wax, add fragrance, and carefully pour it into the container. Let it cool before trimming the wick. With a few tools and some practice, you can create stunning soaps and candles that are both beautiful and functional.
5 Essential Tools Every Crafter Needs
5 Essential Tools Every Crafter Needs Crafting is a beautiful way to express creativity, relax, and create something meaningful. However, having the right tools can make a world of difference in your projects. Whether you’re a seasoned artisan or a beginner, here are five essential tools that should be in every crafter’s toolkit: 1. High-Quality Scissors From cutting fabric to trimming paper, a good pair of scissors is a must. Look for scissors that are sharp, comfortable to hold, and designed for your specific craft, such as fabric shears or precision snips for intricate details. 2. Measuring Tools Accuracy is key to a professional-looking craft. Invest in a reliable tape measure, ruler, or cutting mat with measurements. These tools ensure precise cutting, stitching, or designing. 3. Adhesives Glue is a crafter’s best friend! Depending on your project, you may need fabric glue, hot glue guns, or resin-based adhesives for stronger bonds. Keep a variety of adhesives handy for different surfaces and materials. 4. Crafting Needles and Pins For textile projects, a set of high-quality needles and pins is essential. Opt for needles of various sizes for embroidery, knitting, or hand-stitching, and don’t forget a pin cushion to keep them organized. 5. Storage Solutions Crafting often involves lots of small materials. Invest in storage boxes, organizers, and shelves to keep your workspace tidy and your supplies easy to find. With these essentials in your arsenal, you’ll be well-equipped to tackle any project that comes your way.